
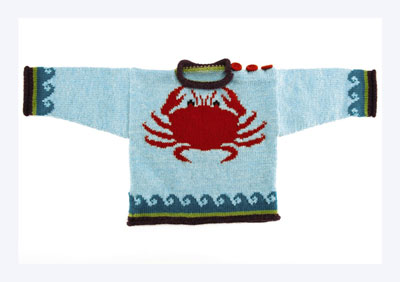
Learn to knit this cozy and easy-to-wear pullover that combines
stranded and intarsia techniques with simple stripes and fun rolled
edges. A buttoned shoulder opening makes the neckline easy for wee
noggins to get through.
Back and sleeves:


-
Size: Finished chest measurement: 25-1⁄2 (27-1⁄2, 29)", to fit a child
-
Yarn: Sportweight yarn (shown: Knit Picks Wool of the Andes Sport, 100% Peruvian Highland wool, 137 yd./50g)MC: Wonderland Heather, 3 (4, 5) skeinsCC1: Claret Heather, 1 skeinCC2: Avocado, 1 skeinCC3: Marina, 1 skeinCC4: Saffron, 1 skeinCC5: Coal, 1 yd.
-
Gauge: 26 sts and 36 rows = 4" in St st on larger needle
-
Needles:Size 3 (3.25mm) 24" circular and DPNs, or size needed to achieve gaugeSize 4 (3.5mm) 24" circular and DPNs, or size needed to achieve gauge
-
Notions:Stitch markerStitch holdersTapestry needleHand sewing needle and threadThree 1" buttons
Back and sleeves:
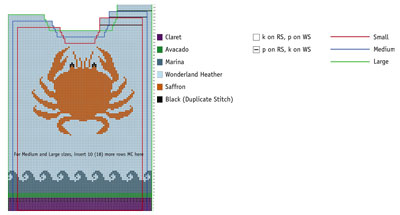
For full-size versions of the charts for this pattern, go to this knitting patterns page.
Begin by working the lower front edge:-
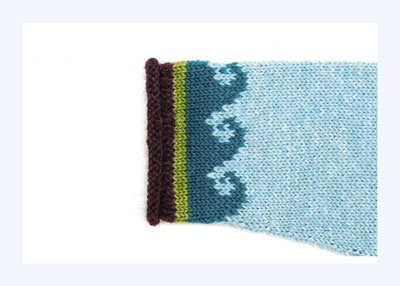
Foll outline on chart corresponding to your size, with larger needle and CC1, CO 83 (89, 95) sts. Work back and forth in St st for 6 rows. With smaller needle, work 3 rows in k1, p1 rib.
-
Change to larger needle and CC2 and work in St st for 3 rows, as shown on chart. Work waves, as shown on rows 13–24, stranding unused color loosely on WS.
-
Cont foll the chart outline corresponding to your size. Work even in MC for 23 (33, 41) rows.
-
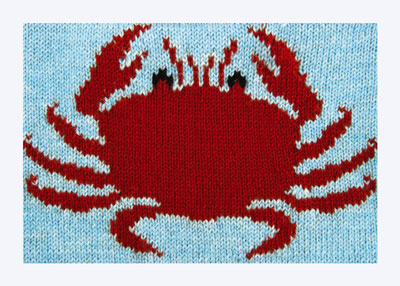
Beg with Row 48 of chart, work intarsia motif as shown.
-
Weave in yarn tails around intarsia motif. Work duplicate st eyes in black, as indicated on chart.
-
As indicated on Row 105 (109, 113) of chart, work 30 (28, 26) sts. Work next 23 (33, 43) sts and place them on a holder, work to end of row — 30 (28, 26) sts each side.
-
Cont working on right shoulder only. Work dec as foll on the next 3 RS rows: K3, ssk, knit to end of row — 27 (25, 23) sts. Work even for 3 more rows. Place live shoulder sts on holder.
-
Beg with a WS row, reattach working yarn to left shoulder. Cont working according to chart, reversing neckline shaping.
-
Work even for 3 more rows. Next row (RS): Purl. Work 4 rows in St st. BO loosely. Weave in ends and block.
-
Foll outline on chart corresponding to your size, with larger needle and CC1, CO 83 (89, 95) sts. Work back and forth in St st for 6 rows. With smaller needle, work 3 rows in k1, p1 rib.
-
With larger needle, change to CC2 and work in St st for 3 rows, as shown on chart. Work waves, as shown on Rows 13–24, stranding unused color loosely on WS.
-
Cont foll the chart outline corresponding to your size. Work even to Row 114 (118, 122) of chart.
-
On Row 115 (119, 123), work first 27 (25, 23) sts and place these sts on a holder for right shoulder. Work next 29 (39, 49) sts and place them on a holder for back neck. Work back and forth in k1, p1 rib for 8 rows on rem 27 (25, 23) sts to form under-placket. BO loosely in patt.
-
Weave in ends and block.
-
Foll outline on chart corresponding to your size, with larger DPNs, CO 54 (60, 66) sts. PM and join for working in rnds. Work 6 rnds in St st. With smaller DPNs, work 3 rnds in k1, p1 rib.
-
Change to larger DPNs and cont working in patt as indicated on rows 10–24 of chart.
-
Beg with Row 25 of chart, inc 1 st at each end of every 5th rnd 11 times as shown on chart — 76 (82, 88) sts. Work even for 3 (12, 21) rnds after last inc. BO loosely.
-
Make a second sleeve to match.
-
Weave in ends and block.
-
With RS tog, join right shoulder using 3-needle BO.
-
Fold left front placket hem to WS and stitch in place invisibly by hand.
-
Beg at left placket edge, with smaller needle and CC2, pick up and knit 10 sts along left neck edge, work 23 (33, 43) center front sts from holder, pick up and knit 10 sts along right neck edge, work 29 (39, 49) back neck sts from holder, pick up and knit 10 sts along back left-shoulder under-placket. Work 2 rows in CC2 in St st. Change to CC1 and purl 1 WS row. Work 3 rows in k1, p1 rib. Change to larger needle and work 6 rows in St st. BO loosely.
-
Make button loops along edge of hemmed placket. Sew buttons to ribbed under-placket, under loops.
-
Sew sleeves in place, beg at shoulder seam on right and center of placket on left.
-
Sew side seams. Weave in any rem ends.
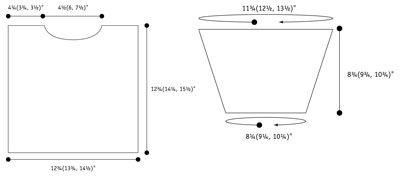 Crabby sweater schematic.